
Quick Guide to Using Squarespace
Using Squarespace for digital marketing efforts can provide several advantages to marketers. The platform integrates essential marketing tools and SEO capabilities, enabling businesses to increase online visibility and reach their audience effectively. This guide provides a straightforward overview of how Squarespace can be a powerful digital marketing platform.

Getting Started with Squarespace
Squarespace offers a range of plans tailored to different needs—from personal blogs to full-fledged e-commerce platforms. Assessing requirements is key; factors such as budget, inventory scale, desired analytics, and advanced website features should be considered.
Setting up a Squarespace account is a straightforward process. Visiting the Squarespace website and clicking “Get Started” leads to a template selection—this choice should be decided with the intended brand or be closest to the envisioned design. Following template selection, details are entered to create an account. A free trial is usually available to test features before committing financially.
With an account set up, familiarize yourself with the Squarespace interface. The dashboard serves as mission control, providing access to site management, web design customization, marketing tools, and analytics. Time should be spent exploring each section:
- Pages: This is where content is added and organized, including pages, blog posts, and portfolio items.
- Design: Customization of templates and site styles happens here, along with branding elements like logos and colours.
- Commerce: For those managing an online store, this section handles products, orders, inventory, and customer information.
- Marketing: This hub includes SEO settings, promotional pop-ups, email campaigns, and social media integrations.
- Analytics: Performance tracking, visitor behaviour monitoring, and insight gathering to inform marketing strategies are all located here.

Website Design and Templates
Templates set the tone for a website’s navigation, aesthetics, and overall impression. Consider the industry, content type, and the user journey. A visually-driven brand might lean towards a template with a rich image gallery, while a text-heavy blog may prefer a design that enhances readability. Squarespace’s template library is extensive, with filters that help narrow options based on specific design needs.
Once a template is chosen, Squarespace’s Style Editor is a tool that enables changes to fonts, colours, and spacing—transforming a template into a unique brand asset. Always maintain consistency across all digital platforms. Adjusting styles to reflect a brand’s palette and typography not only reinforces brand identity but also impacts visitor perception.
A site’s layout can give a positive user experience. A well-structured website guides visitors effortlessly from one section to another, increasing engagement and reducing bounce rates. Squarespace offers flexibility in layout design, enabling the creation of custom page layouts that best display content.
Strategically place call-to-action buttons, ensure contact information is easily accessible, and design with mobile responsiveness to enhance user experience and engagement. Squarespace’s content blocks can intersperse text with imagery or multimedia, keeping users interested and engaged. Utilizing spacing and divider features helps in creating a clean, organized look that prevents cognitive overload.
Content Creation and Management
Create content that captivates and retains the attention of an audience. The key to compelling content is relevance, clarity, and value. Content should be tailored to address the needs and interests of the target audience, presenting information clearly and concisely—consistent tone and style and ensuring a seamless reader experience. High-quality visuals and interactive elements can also enhance written content, making it more engaging.
Content Management System (CMS)
Squarespace’s CMS helps the managing of website content efficiently. It provides a user-friendly interface where content can be added, edited, and organized with ease. The platform allows for the scheduling of posts, which helps in maintaining a consistent content calendar. The CMS supports various content types, from text and images to videos and audio, making it a versatile tool for creating diverse and dynamic web pages.
It’s essential to categorize and tag content appropriately within the CMS. This not only aids in organization but also enhances the discoverability of content both on the website and via search engines. Utilizing the built-in SEO features to optimize page titles, descriptions, and URLs can further improve content visibility.
Adding Blogs, Galleries, and Forms
Adding a blog can drive traffic and provide a platform for sharing insights, updates, and industry news. Squarespace’s blogging tools allow for seamless integration of blog posts into the site’s layout, and the social sharing features make distribution across social networks straightforward.
Showcase work, products, or events with galleries that can be created with a few clicks and various presentation styles, from slideshows to grid layouts. These visual elements can significantly increase user engagement and time spent on the site.
Forms help in generating leads, gathering feedback, and facilitating communication. Squarespace’s form builder supports custom form fields, enabling the creation of contact forms, surveys, and more. Integrate with third-party services like Google Drive and Mailchimp to automate managing submissions and using them for wider marketing campaigns.
Search Engine Optimization (SEO)
Search Engine Optimization (SEO) enhances a website to improve its visibility when people search for products or services related to the business in search engines like Google. The fundamentals of SEO encompass a range of strategies, from keyword research and optimizing content to building backlinks. The goal is to increase organic search engine traffic by achieving higher rankings in the search results. Squarespace provides various built-in tools and features to support SEO efforts:
- Site Title and Tagline: Ensure the site title and tagline include the main keywords that describe the business.
- SEO Page Titles and Descriptions: Craft unique and descriptive titles and meta descriptions for each page to improve click-through rates from search results.
- Clean URLs: Use clear and concise URLs that include relevant keywords for each page.
- Heading Structure: Organize content using a logical hierarchy with H1, H2, and H3 tags to make it easier for search engines to understand content structure.
- Alt Text for Images: Provide descriptive alt text for images, helping search engines to index them properly.
- Mobile Optimization: Since Squarespace templates are responsive, regularly check how the site looks on various devices and adjust if necessary.
- SSL Certification: Activate SSL to secure the site and possibly get a ranking boost from search engines.
- Content Quality: Publish high-quality, original content regularly to keep the site fresh and engaging.
- Internal Linking: Use internal links to help search engines crawl the site more effectively and to keep users engaged.
- Sitemaps: Squarespace automatically generates sitemaps. Make sure to submit the sitemap to Google Search Console.
Monitoring the performance of SEO strategies is essential in understanding their effectiveness and making informed decisions. Squarespace Analytics offers a comprehensive suite of tools that provide insights into how visitors find and interact with a site.
The ‘Traffic Overview’ section displays the sources of website traffic, which can indicate the performance of an organic search. The ‘Search Keywords’ panel shows the terms and phrases users search for when they discover the site. This information can be invaluable for refining SEO strategies.
Another feature is the ‘Page Metrics’, where the performance of individual pages can be analyzed. This includes the number of visits, time spent on a page, and the bounce rate. Such metrics indicate the quality and relevance of the content and can guide improvements. It also aids in spotting trends, which can provide opportunities to capitalize on issues that need to be addressed, allowing for adjustments to the SEO strategy.
Squarespace’s Marketing Tools
Squarespace has built-in marketing tools designed to help expand reach and engage with audiences more effectively. The marketing tools are designed to create a holistic ecosystem where a website can not only stand out with its design but also effectively attract and engage its intended audience. Understanding and utilizing these tools can increase a site’s online presence.
Pop-ups and Banners: They can highlight special offers, encourage newsletter sign-ups, or alert visitors to important news. These tools include customization options, such as timing controls, frequency settings, and flexible design choices to match the site’s aesthetic. They improve user engagement and serve as a call to action that can increase conversions.
Email Marketing: Their email marketing service enables the creation of stylish, branded emails that can be sent directly from the website platform. This integration allows for pulling content from the website into the email, ensuring brand consistency and saving time.
Additionally, the platform facilitates audience segmentation and personalized campaigns, which are critical for targeted messaging. The performance of these email campaigns can be tracked, providing insights into open rates, click-through rates, and subscriber activity, which can inform future marketing strategies.
Integrating Social Media: Connect to various social platforms, allowing for the synchronization of content and simplifying the process of sharing updates, products, and blog posts directly with social media followers.
Buttons and links to social media profiles can be easily added to a Squarespace site, enhancing visibility and offering visitors multiple ways to engage with the brand across the web. Furthermore, social media feeds can be embedded directly into the site, keeping the content dynamic and current without constant manual updates.
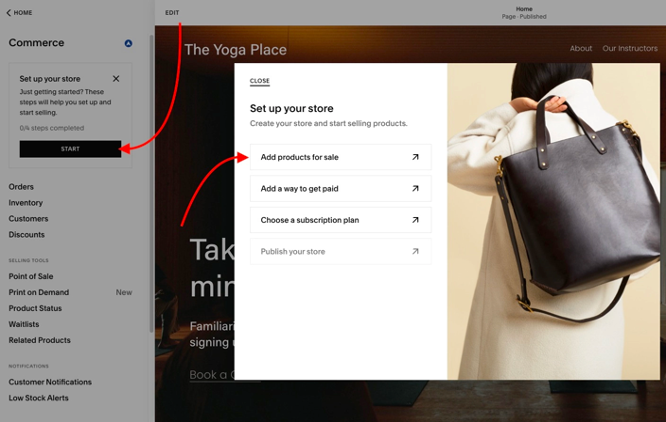
Setting Up an Online Store
The platform offers a range of customizable templates specifically designed for e-commerce web development, ensuring that the setup caters to the needs of various retail sectors. First, one selects a template and then adds products, including physical items, digital downloads, or services. Each product can have its detailed page with images, descriptions, prices, and variant options.
Squarespace provides the tools to set up secure payment options, including credit card processing, PayPal, and Apple Pay. Inventory management is integrated within the platform, offering real-time tracking and alerts for low stock levels. Shipping configurations are also manageable within Squarespace, with options for setting up various shipping methods and rates.
Once the store is operational, effective management of orders is key to maintaining customer satisfaction and encouraging repeat business. The e-commerce platform allows easy oversight of order statuses, from processing to delivery. Automated emails keep customers informed about their purchase progress, and the option to print packing slips and shipping labels directly from the dashboard streamlines the fulfilment process.
Customer relationship management is another feature to consider using. With integrated tools, collect and utilize customer data to personalize shopping experiences, create targeted marketing campaigns, and offer loyalty rewards. There are also options for customers to create accounts, enabling faster checkouts and allowing them to view their order history and track new orders.
Analytics and Performance Tracking
Squarespace Analytics provides data that can impact the direction and success of a website’s marketing strategy. This tool provides a variety of metrics, including page views, visitor demographics, and conversion rates, presenting a detailed picture of how people interact with the site.
By examining this data, one can gauge the effectiveness of content, design, and marketing strategies. Regularly reviewing and acting on this data to ensure that strategies remain agile and aligned with user behaviour and preferences, leading to better performance and higher conversions.
Understanding Traffic Sources and User Behavior
Identifying where website traffic comes from helps tailor marketing efforts to the most effective channels. The analytics feature breaks down traffic sources into categories such as direct, social, referral, and search, enabling site owners to track which platforms are driving the most traffic and conversions.
Moreover, the platform provides insights into user behaviour through metrics such as time on site, bounce rate, and actions taken. Understanding these behaviours can help identify content that resonates with visitors or areas where the site may be underperforming.
The ability to track the customer journey from the first visit to purchase also allows fine-tuning the sales funnel to improve conversion rates. If analytics reveal many abandoned carts, strategies like cart abandonment emails or promotional discounts might be considered to reclaim lost sales. The insights can also help with content marketing, from the type of topics covered in blog posts to the choice of images used. If certain blog posts have a high engagement rate, similar content can be produced to capitalize on that interest.
Conclusion
Squarespace is more than just a website development tool; it’s a comprehensive platform that helps businesses build, manage, and grow their online presence effectively. By using the tools and features offered, businesses of all sizes can craft a robust online strategy that resonates with their audience and drives their digital marketing efforts towards success.
ARCC, based in Singapore, offers specialized website development services, providing custom solutions attuned to the specific requirements of various industries and niches. Contact us for a detailed rundown of the website creation options we have available.