Quick Guide on Starting an Ecommerce Store on Shopify
Back in the day, opening a physical store to sell products required a big investment. Today, that’s no longer the case, as the entry barrier is much lower with an online business. Starting a shop as an online entrepreneur can be both thrilling and overwhelming for most of us, as with today’s technology, we can now sell to anyone everywhere in the world 24/7.
When starting, many of us are unfamiliar with different aspects of running an eCommerce shop, which may sometimes be frustrating. The good news is that E-Commerce platforms such as Shopify make it simple for anyone to create an online store that looks good and functions well without professional design skills or coding knowledge.
For those looking to build a Shopify store but unsure where to begin, this article will provide the necessary information to create a Shopify business. It will cover the benefits of selling on the platform, what is needed to set up a Shopify site, the fees involved, and the steps to establish a Shopify store.
Understanding Shopify
Shopify is a comprehensive e-commerce platform that enables individuals and businesses to create their online stores. It is a subscription-based software that allows users to set up a web store and sell their products or services with ease.
Launched in 2006, Shopify has evolved to become one of the leading e-commerce solutions in the market, powering millions of businesses across the globe. Unlike traditional e-commerce software that requires server installation and technical setup, Shopify is a cloud-based service that offers a hosted solution.
This means that store owners can access their shops from anywhere with an internet connection without worrying about server maintenance or software upgrades. By choosing Shopify, businesses can benefit from a combination of ease of use, powerful features, and scalability, making it suitable for new entrants and established companies in the e-commerce space.
- User-Friendly Design: The platform is engineered for ease, allowing users of all skill levels to launch and administrate their virtual storefront with a minimal learning curve involved.
- Tailored Storefronts: Users can access numerous customisable themes and a versatile editor, allowing for a highly personalised and brand-aligned online presence.
- Robust Security Measures: The service prioritises security, offering peace of mind through PCI compliance and encrypted transactions to protect sensitive data.
- Optimised for Mobile Commerce: Responsive designs ensure that stores look and function optimally across many devices, catering to the substantial market of mobile shoppers.
- Seamless Payment Solutions: It facilitates transactions by integrating its payment gateway and supporting various external payment services.
- Built-In SEO and Marketing: A set of SEO tools helps to improve search engine visibility, while marketing features like discounts and gift cards aid in promotional efforts.
- Diverse App Integrations: An expansive app store allows for extensive functionality enhancements, ensuring that the platform can adapt to a wide array of business needs.
- Comprehensive Customer Support: Round-the-clock customer service ensures that assistance is readily available, critical for maintaining continuous operations.
- Scalable Infrastructure: The platform is designed to grow with the business and can handle increased products and transactions without hindering site performance.
Setting Up a Shopify Store
Launching an online storefront on this platform involves a series of straightforward steps designed for a seamless user experience. Establish a store that not only looks professional but is also geared towards providing an optimal shopping journey for customers.
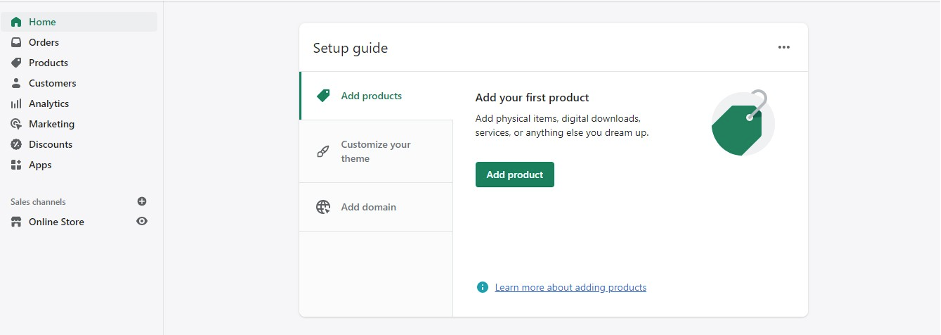
Creating a Shopify Account:

- Visit the Shopify Website: The first step is to navigate to the Shopify homepage.
- Start a Free Trial: Opting for the ‘Start free trial’ option allows exploration of the platform’s features without immediate investment.
- Enter Business Details: Information about the business, including an email address, password, and a unique store name, must be provided.
- Complete the Setup: Filling in additional business details helps customise the platform’s setup to meet specific needs.
Choosing a Shopify Theme:
- Select a Theme: Access the ‘Online Store’ section and click on ‘Themes’ to explore available options. It’s essential to choose a theme that reflects the business’s brand and functionality needs.
- Customise the Theme: The theme editor is available for tailoring the layout, colours, and design elements to the store’s branding.
- Preview Changes: Before finalising any changes, a preview in desktop and mobile views ensures everything is displayed correctly.
Essential Settings:
- Configure Payment Gateways: In the ‘Settings’ menu, selecting ‘Payments’ allows the setup of preferred payment methods, ranging from Shopify Payments to third-party gateways.
- Set Up Shipping: Within ‘Settings’, the ‘Shipping and Delivery’ section is where shipping rates and zones are determined, offering options like flat rate, free shipping, or weight-based rates.
- Manage Taxes: Under ‘Settings’ and ‘Taxes’, the platform can automate tax calculations, but it remains critical to ensure these settings comply with the local tax laws.
Adding Products:
- Add Products: By navigating to ‘Products’ and selecting ‘Add product’, details such as name, description, and price can be inputted.
- Upload Images: Including high-resolution images is essential for showcasing products and influencing consumer decisions.
- Organise Categories: Using ‘Collections’, products can be grouped into various categories for more efficient customer navigation.
Setting Up Collections and Navigation:
- Create Collections: In the ‘Products’ menu, the ‘Collections’ feature allows for organising products into specific groupings like ‘New Arrivals’ or ‘Sale Items’.
- Customise Navigation: Through the ‘Online Store’ and ‘Navigation’ sections, menu structures are established to guide customers easily to various parts of the store, ensuring a user-friendly shopping experience.
Essential Shopify Features
Shopify offers a suite of essential features designed to streamline the process of running an online store. From comprehensive inventory management to SEO and customer engagement tools, this platform is equipped to handle the demands of modern e-commerce.
The platform delivers a range of key features that cater to the needs of e-commerce business owners, including a user-friendly interface, customisable themes, secure payment processing, and extensive app integrations. These features are designed to help store owners manage their online business efficiently while providing a pleasant shopping experience for customers.
Inventory Management on Shopify: The platform allows for real-time tracking of stock levels, automated restock notifications and integration with various inventory apps. This helps in maintaining accurate inventory records, which is vital for order fulfilment and customer satisfaction.
SEO Features: These include customisable headlines, titles, and meta tags, along with auto-generated sitemaps and the ability to edit robots.txt files. By optimising these elements, stores can enhance visibility in local search engine results, attracting more potential customers.
Apps and Extensions: From advanced analytics to inventory and shipping solutions, these apps enable storefront customisation to meet specific business needs and streamline operations.
Customer Engagement Tools: Shopify supports a range of customer engagement tools, including options to integrate newsletter sign-up prompts and install live chat support. These tools allow for direct customer communication, providing a channel for support, feedback, and marketing promotions.
Design and User Experience
A professional design instils trust and communicates brand value. Responsive design ensures that the e-commerce store adapts to various screen sizes, providing a seamless experience for users on desktops, tablets, or smartphones. This adaptability is essential, directly affecting traffic, engagement, and bounce rates. The design and user experience (UX) of an e-commerce store play a role in attracting and retaining customers.
A professional, responsive design and a thoughtful UX strategy can significantly impact consumer behaviour and sales conversion rates. A good UX goes beyond aesthetic appeal, encompassing the ease users can navigate and interact with the online store. It requires a deep understanding of the target audience to create a journey that feels intuitive and engaging from the homepage to checkout. Here are some tips:
- High-Quality Images: Clear, high-resolution graphic images that showcase products from multiple angles are vital.
- Detailed Descriptions: Write accurate, detailed product descriptions to help users make informed decisions.
- Intuitive Layout: Products should be displayed in an organised manner, with easy-to-use filters for sorting.
- Consistent Branding: The product display should align with the overall brand for a cohesive experience.
- Guest Checkout Options: Allowing purchases without an account.
- Clear Progress Indicators: Showing users how far along they are in the checkout process.
- Multiple Payment Options: Including various payment methods to cater to different user preferences.
- Touch-friendly Navigation: Ensuring all buttons and links are easy to tap on a touch screen.
- Fast Load Times: Mobile users expect quick access; thus, optimising speed is crucial.
- Responsive Design Testing: Regularly testing the store on various devices to ensure consistent quality.
Launching a Shopify Store
Launching a Shopify store is as much about preparation as it is about execution. With a pre-launch checklist, targeted marketing strategies, comprehensive analytics setup, and a carefully crafted ad campaign, the store is well-positioned to impact the e-commerce space.
Pre-launch checklist:
- Finalise Store Design: Confirm that all pages look professional and function correctly.
- Test Checkout Process: Perform transactions using all available payment methods to ensure a smooth process.
- Ensure Mobile Responsiveness: The store should offer an outstanding experience on all devices.
- Set Up Essential Apps: Apps necessary for inventory management, shipping, or customer service must be installed and configured.
- Prepare Inventory: Stock levels should be accurate and products ready for dispatch.
- Create Legal Pages: Privacy policies, terms of service, and refund policies should be drafted and published.
- Optimise for SEO: Product titles and descriptions must be optimised for search engines.
Marketing Strategies for the Launch:
- Social Media Teasers: Generate anticipation with previews of products and exclusive content.
- Email Campaign: Notify subscribers of the launch, providing special deals to early birds.
- Influencer Partnerships: Engage with influencers to expand reach and enhance credibility.
- Launch Promotions: Initiate special offers or discounts for the inaugural customer base.
Setting Up Analytics to Track Launch Success
- Install Google Analytics For insights into web traffic, user engagement, and conversion metrics.
- Set Up Conversion Tracking: Establish conversion tracking in Google Analytics and other advertising platforms.
- Monitor Real-time Analytics: Watch live data on launch day to identify and troubleshoot any issues promptly.
Creating the First Ad Campaign
- Identify Target Audience: Pinpoint the ideal customer demographic for tailored advertising.
- Choose the Right Platforms: Select platforms where the target demographic is most active.
- Craft Compelling Ad Content: Develop engaging visuals and text that show the store’s unique value proposition.
- Set a Budget and Schedule: Determine how much to spend on the campaign and the best times for ad display.
- Test and Optimise: Begin with diverse ad sets and refine them based on their performance metrics.
Additional Resources
To further support the journey of establishing and growing a store, these resources can provide guidance, solve potential issues, and enhance the knowledge needed to succeed in the e-commerce space. Leveraging these resources can simplify starting and scaling an online store on Shopify. They can help to fill knowledge gaps, offer solutions to specific challenges, and provide guidance tailored to individual business needs.
Shopify Help Center and Community Forums
- Shopify Help Center: The Help Center is an extensive library of articles, guides, and how-tos covering various topics, from setting up the store to advanced customisation.
- Shopify Community Forums: Engage with a vibrant community of Shopify merchants and experts to exchange ideas, ask questions, and gain insights from shared experiences.
Recommended Reading and Tutorials
- Shopify Academy: A platform offering free training and tutorials on how to start and grow a business with Shopify.
- E-commerce Blogs and Books: Several reputable blogs and books can provide advice on best practices in e-commerce and digital marketing.
- Shopify Webinars: Regularly scheduled webinars can help merchants learn about new features and strategies for online selling.
Professional Services and Expert Help
- Shopify Experts: A curated community of trusted third-party agencies and freelancers who can help with everything from store setup to SEO.
- Marketing and SEO Services: Professional agencies can assist in creating effective marketing campaigns and optimising the store for search engines.
- Design Services: For those seeking custom designs, professional designers can craft unique storefronts that stand out.
Conclusion
Setting up and launching a Shopify store is an accessible path to e-commerce that can be navigated relatively easily, thanks to the platform’s user-friendly interface and comprehensive features. From the importance of a visually appealing, responsive design to the necessity of a frictionless user experience, the discussed strategies are fundamental to creating a successful online storefront.
ARCC provides professional E-commerce website development services in Singapore, focusing on creating robust e-commerce solutions. We help with integration services to ensure e-commerce platforms operate smoothly and cohesively. We also offer regular updates and maintenance to keep your site current and functioning optimally. For a complimentary consultation with our digital marketing experts, feel free to get in touch with us.